Sunday, January 31, 2010
Thursday, January 28, 2010
Tutorial: Framed Book Page Valentines Heart Decor
Super Cute and Super Easy!!!
This is my very first TUTORIAL, so hopefully I don't mess anything up :)
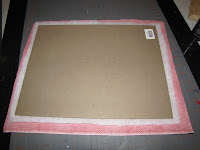
I started out by sanding and spray painting an old frame black. Since I wanted this to be for VALENTINES DAY I chose a red pin dot fabric and cut it 1 inch larger than the cardboard backing of the frame (make sense). My frame hangs, but if you have a frame with the easel that works too, just make sure to cover the side without the easel :) I then cut a piece of thin batting about a 1/2 inch bigger than the cardboard. You don't have to use the batting, I don't think it makes a difference really, i just wanted it to be a little poofy. Using spray adhesive I attached the batting to the cardboard and the fabric to the batting.
Starting with the middle on one side I folded the fabric over to give me a clean edge and then glued it down using my hot glue gun. Then I did the same for the opposite side and then the last 2 sides as well.
I Did the corners by folding the fabric and then gluing down the center and then folding and gluing the side flaps down.
I tore the cover off an old paperback book and cut the rough margin (from the spine) off and then cut the page into 2x2 squares. I printed a heart off using Word and traced it onto fusible interfacing, cut it own and then ironed it down to my fabric covered board.
Now for the FUN part ...
You all remember elementary school and making fabulous creations out of tissue paper and glue? Well, that's what you are going to do here, only with the book pages. I'm not gonna lie, it's rather time consuming, but totally worth it. I started by using white glue, but it wasn't drying fast enough so I switched over to my glue gun. One of those hot glue melting pots would have been FABULOUS to have but I don't have one :( Anyway, I started with the center and worked my way out to the edges. I chose to put mine fairly close together, but you don't have to and it will still look darling.
I'm thinking this could be great for a child's room, just use their initial and maybe some cute scrapbook paper and fabric that coordinates with their bedroom. Or super classy in an entry way with the initial of your last name and maybe a nice damask fabric.. OOH I think I'm going to do that next!!
I'm linked up to the two fabulous Valentine link Parties below ... Check 'em out!!!
Allow me to introduce ...
THE NEW LOVE OF MY LIFE!!!!
For the LONGEST time I've been in extreme need of something to hold all of my ribbon. I was so tired of digging through boxes trying to find what I needed. I've seen ribbon holders at the craft stores but they seemed so ridiculously overpriced nor do they seem to hold very many spools.
My extremely kind and talented dad decided that he would whip this little baby up for me. I think he used 3 (maybe 4) 1x4's, they were around $2 or $3 each at Home Depot. You may want to get something thats maybe 5 or 6 inches, if you have a lot of large spools. But 4 inches does the trick for the standard sizes. Originally he wanted it to be freestanding but with the Bucket crawling around it needed to be on the wall, and this way it takes up less space.
Using his router he made the slots at a diagonal so the dowels are easily removable. I think all together this was around $15, not too shabby for a custom made ribbon holder!! I know that these aren't really detailed instructions, but if anyone would like to make one of these let me know and I can get you some plans :)
Monday, January 25, 2010
Tuesday, October 13, 2009
Fun Dice Blocks
So, I'm SURE that these have been created 100's of times out there in blogland and I'm also sure that I could do a quick google search and see all of them in their beauty ... but, I like to feel like my idea was my own, so I'm not going to do that :) sorry, the pic is a little bit blurry ... Still haven't got the settings right on this camera.
I've been trying to decide what to put on this shelf (without spending any money) and for the life of me nothing I had was working. So, I looked at my color scheme (Red, Black, White/Cream) and looked at my supplies. I have lots of wood blocks from this project so I thought that I would make dice out of them.
These blocks started out as a 4x4 (which is really 3.5x3.5) and I cut them down to 3.5 blocks. Sanded the heck out of them and then painted them a creamy ivory color. I cut a few 1 inch circles on the heaviest cardstock I had on the cricut machine and that was my stencil. I drybrushed the dots with some black paint and then did some drybrushing on the edges and over the face of the dice. Then, I finished up with a coat of clear finish and VOILA!! Super easy, super cute, and super cheap!!
* I just got my camera back tonight so I didn't take any "step by step" pictures. But, I have a feeling that I will be making more of these in the near future, so I will be sure to take some then.
Friday, October 2, 2009
Seriously like the CUTEST thing I have ever made ... besides my son of course :)
Ok, so I LOVE LOVE LOVE the way this turned out!!! I've had my eye on the set of 5 paper mache nesting boxes but I never really knew what I would do with them. Anyway, I went to JoAnn's today with the intentions of getting the material for Bucket's skunk costume and while I was gathering it all up I realized that the costume was way too intense and expensive for a 7 month old, so I scrapped it and walked around. I had my 40% and 50% off coupons so I decided to spring for the boxes (usually $20 but only $10 with the coupon, SCORE, I'm going back for another set with my other coupon).I love Halloween but have never really had a lot of decorations for it so I decided these boxes would become something SPOOKTACULAR!! The scrapbook paper at JoAnn's is horrifying (and I really mean it, they have one little aisle). So, I went to Roberts and picked up the paper and some of the little things that I used to embellish. All of the Halloween Decor was 50% off, ANOTHER SCHORE!! I bought the skulls at the Dollar store, great find!!I started by covering all the boxes in the paper AND lots of decoupage and then went to work stacking and decorating!! The googly eyes on the Bottom Box are SUPER FUN ... Kinda time consuming to wrap all the paper and then to put a few good coats of decoupage but super easy!! Seriously, my mom is trying to talk me into letting her have it so she can decorate her office with it ... I am totally going to make some Christmas ones and probably even Thanksgiving, just because I love how these turned out.
Subscribe to:
Posts (Atom)