THE NEW LOVE OF MY LIFE!!!!

For the
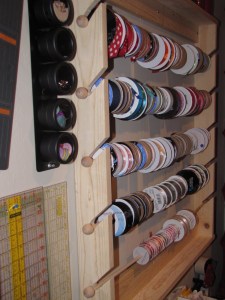
LONGEST time I've been in extreme need of something to hold all of my ribbon. I was so tired of digging through boxes trying to find what I needed. I've seen
ribbon holders at the craft stores but they seemed so ridiculously overpriced nor do they seem to hold very many spools.
My extremely kind and talented dad decided that he would whip this little baby up for me. I think he used 3 (maybe 4) 1x4's, they were around $2 or $3 each at Home Depot. You may want to get something thats maybe 5 or 6 inches, if you have a lot of large spools. But 4 inches does the trick for the standard sizes. Originally he wanted it to be freestanding but with the Bucket crawling around it needed to be on the wall, and this way it takes up less space.
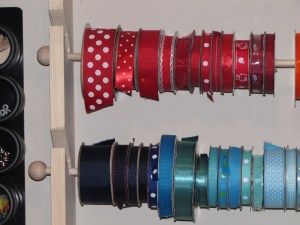
I put the spools on wooden dowels from the craft store, ( less than $1 each) and bought a pack of knobs for a couple bucks. Make sure to get the size knob that will fit on the end of the dowel. Both knobs are removable so its easy to access the empty spool or to add more.
Using his router he made the slots at a diagonal so the dowels are easily removable. I think all together this was around $15, not too shabby for a
custom made ribbon holder!! I know that these aren't really detailed instructions, but if anyone would like to make one of these let me know and I can get you some plans :)


 I honestly have no VALENTINES DECORATIONS, totally sad right? I know. Anyway, I was looking around at my usual blog sites and came across a couple great ideas HERE and HERE, I decided to mix the two together and this is what I came up with:


 I put the spools on wooden dowels from the craft store, ( less than $1 each) and bought a pack of knobs for a couple bucks. Make sure to get the size knob that will fit on the end of the dowel. Both knobs are removable so its easy to access the empty spool or to add more.