I am leaving tomorrow for a spontaneous vacay and I don't know when I'll be back!! Seriously, I don't :) Anyhoo, I don't plan on packing up my craft room and taking it with so I won't be making and posting any fun new projects. Well, who knows ... it could happen, but I PROBABLY wouldn't count on it. I just wanted to let you all know, so when you notice that I am MIA, you know that I didn't just disappear.
With that being said ... anyone want to guest post? You TOTALLY don't have to, I'm fine with just taking a small hiatus, but if any of you newbies would like to test it out or whatever, then let me know!!!
Thanks!!!


Thursday, April 29, 2010
Tuesday, April 27, 2010
Show Us What You're Workin' With Wednesday #9
Every time I walked into Buckets room I would see his sad and pathetic lamp. I knew it was ugly, but I honestly didn't take the time to sit down and think about a solution. Then, last night, it came to me ... I jazzed it up with some ribbon!!!

First off ... please ignore the fuzzy trim around the top of the shade. I originally was going to use it, but didn't like the way it looked. You will see what I used later.
I started with the wider ribbon widths ... 1 1/2", 1", and 7/8" (or whatever it is LOL). I put a dab of hot glue on the top and then stretched the ribbon down to the bottom and put another dab of glue. Don't glue all the way down the ribbon, or it may leave a bumpy line from the glue. As you can see in the picture, some of the lamp shade was showing through after I put the wider ribbons on. ***I didn't take a lot of pictures, because it was the same thing over and over and over. ***

After the large ribbons were on I used the smaller ones ... I think 1/2"??? to cover up all spots that were still showing lampshade through.

Eventually, after about an hour of gluing on ribbon, everything was covered and looking good. The top and bottom were both kinda ugly, so I wrapped some twine around and called it good.

Super cute right? The lamp base is kinda blah, I'm debating whether or not to paint it. What do you think? Again, sorry for the lack of pictures, it was SOOOO EASY!!!
Ok, let's party!!!
Fav's from WYWW #8!!
 Becca, from Bare feet on the dashboard, made this FABULOUSLY DARLING Picket fence picture holder. She got the wood off the side of the road!! I love how you all are turning trashing to treasures!!! Tomorrow is trash day, and I'm SOOO going to drive around looking for some treasures!!
 This next one is A-W-E-S-O-M-E AWESOME!!! Judy, from In His Grip, made this bench from an old bed!!!! Dang, its beautiful!!! I have to find an old spindly bed ... but now there is going to be a mad rush for them and I will NEVER find one ... DANG IT!!!
 Jess, over at A Winding Road, made this totally cute and totally easy paper owl mobile!!! Owls are all over the place lately, and these are just TOO STINKIN' CUTE!!!!
Thanks for all your awesome submissions and I can't wait to see what you do this week!!! I will get the party up in a few hours!!!
Monday, April 26, 2010
I have a good feeling about this one!!

You all remember Jennie, from Cinnaberry Suite? Well, she is having a SWEET giveaway right now ... $40 gift card to CSN stores. I don't know about you, but it seems like there are 489 blogs out there that are doing a similar giveaway ... AND I LOVE IT!!! She has a nekkid mantle that needs some love, and she is asking for our help. So, mosey on over there, give her some ideas and enter to win!!!! And while you are there, check out her SUPER CUTE old fence recycled picture holders!!! LOVE THEM!!!
Friday, April 23, 2010
Knock-Off Necklaces
I ♥ necklaces, but I've never really made any. Don't ask me why ... I think it's mostly because I'm SUPER DUPER indecisive and I will spend hours (literally) standing in the bead/supply aisle just staring at everything trying to make up my mind. It's soooo annoying, but I can't help it.
So ... the other day I was at the thrift store with Bucket and I decided to pop in to the clothing store next door.
I saw this super cute necklace, then I saw the $12.99 price tag and realized how simple and INCREDIBLYCHEAP it would be to recreate it myself. So, I ran to Joann's for a few supplies and headed home.

All you need is:

I bought 1 yard of Chiffon and maybe used 1/4 of it, if I even used that much. I traced a lid to an old jar to get the size circle that I wanted, you could use anything you want or freehand it. Then I folded the fabric 4 times, so I wouldn't have to make as many cuts. I pinned the template to the fabric and started cutting. Don't worry if your circles aren't perfectly round, it gives it a more natural look.


So ... the other day I was at the thrift store with Bucket and I decided to pop in to the clothing store next door.
I saw this super cute necklace, then I saw the $12.99 price tag and realized how simple and INCREDIBLYCHEAP it would be to recreate it myself. So, I ran to Joann's for a few supplies and headed home.

All you need is:
- ribbon *The width you need is dependent on the size of your ribbon clasps*
- ribbon clasps *You can buy these at the craft store for a few dollars. I got a package with a variety of sized for $2.99*
- beads *I used an old bracelet that needed to be re-strung because Bucket stretched it out*
- Jewelry making thread *This picture shows regular clear thread, but TRUST me when I say to spend the $3.00 and buy the plastic-y jewelry thread, it will prevent the necklace from breaking*
- Chiffon *I first made these using the $6.99/yard Polyester chiffon that is standard at most fabric stores, and it was a MISTAKE!!! Polyester chiffon frays like a son of a gun!! You want to use Nylon Chiffon, it's TONS cheaper and won't fray when you cut it. I wasn't able to find it at ANY of my local fabric stores so I ordered it online here. It was only $1.60/yard. TONS CHEAPER!!! And they have TONS OF COLORS!!

I bought 1 yard of Chiffon and maybe used 1/4 of it, if I even used that much. I traced a lid to an old jar to get the size circle that I wanted, you could use anything you want or freehand it. Then I folded the fabric 4 times, so I wouldn't have to make as many cuts. I pinned the template to the fabric and started cutting. Don't worry if your circles aren't perfectly round, it gives it a more natural look.

Each cut would leave me with a stack of 8 circles, I did this 6 times.

Once again, this picture shows me using regular thread, don't do it unless you have no other options. I quadrupled the thread and looped it through one of my ribbon clasps and put the ends back through the eye of the needle. But since you won't be using thread, all you have to do is tie a few knots with your jewelry thread to secure it to the clasp :)

Now it's time to start beading. Count out how many beads you want to use, the more you use the longer the necklace will be. I used 12 for this first part, but now that it's done I wish I would have only used 7, oh well ...

For this necklace I put my needle straight through the middle of the stack of 8 circles and called it good.

For the other necklaces I folded a few of the circles in half and then put the needle through the middle, right about my thumb. If you fold some of them, it will give you a fuller look. *** You will see what I mean when you look at the finished product.***
I strung 3 beads in between each section of Chiffon circles. After I did all 6 sections, I strung another 12 beads.

I strung the needle through the other ribbon clasp and tied a few knots.

To make sure it was EXTRA sturdy I threaded back through a bead and then knotted it, thread through the next bead and knotted it and I did that 3 or 4 times.
 Here she is, almost done!!!

I cut 2 pieces of ribbon at 14" and burned the ends to keep them from fraying. Then I clamped one end in the ribbon clasp, I wrapped the ribbon around the clasp before I clamped it to help protect the metal from getting dented or scratched.
You're done!!!! So easy right?
Now for some finished pictures!!!

I did this one in ivory. I folded EVERY circle in half, it's extra fluffy and full :)

I LOVE how this gray one turned out!! I don't wear much gray, but I LOVE how sophisticated it looks with the gunmetal colored beads!!
 Red is my ALL-time favorite color, so I couldn't leave her out!!!

So cute right??!!!! Now I need to work on some sort of jewelry organizer ... it's actually in the works and I will show it to you once my closet is finished. :)
And one more time ... let's compare!!

The original
My version, pretty close right??
And let's break down the cost ... If you buy the chiffon online and only use 1/4 yd that's $.40. Since I bought it at Joann's I spent $1.50. The clasps were $2.99 but I got 12 sets or something so that's $.25 and I already had the ribbon, thread and beads.
Sooo, pretty much this necklace only cost me $1.75!!! And if you are smart and buy the online Chiffon, it's going to cost around $.65, assuming you have the beads, thread and ribbon on hand. CAN YOU BELIEVE IT??!!! I think it looks just as good as the original and it cost a TON LESS!!!
REMEMBER ... Don't use the Polyester chiffon or it will fray EVERYWHERE and get all over your shirt when you wear it, trust me!! You don't want to have to remake them like I did :(
If you love the necklace, but don't want to make one, I'm thinking about putting these up in an ETSY store ... let me know if that sounds like something you would be interested in!!
I'm joining these parties:

Once again, this picture shows me using regular thread, don't do it unless you have no other options. I quadrupled the thread and looped it through one of my ribbon clasps and put the ends back through the eye of the needle. But since you won't be using thread, all you have to do is tie a few knots with your jewelry thread to secure it to the clasp :)

Now it's time to start beading. Count out how many beads you want to use, the more you use the longer the necklace will be. I used 12 for this first part, but now that it's done I wish I would have only used 7, oh well ...

For this necklace I put my needle straight through the middle of the stack of 8 circles and called it good.

For the other necklaces I folded a few of the circles in half and then put the needle through the middle, right about my thumb. If you fold some of them, it will give you a fuller look. *** You will see what I mean when you look at the finished product.***
I strung 3 beads in between each section of Chiffon circles. After I did all 6 sections, I strung another 12 beads.

I strung the needle through the other ribbon clasp and tied a few knots.

To make sure it was EXTRA sturdy I threaded back through a bead and then knotted it, thread through the next bead and knotted it and I did that 3 or 4 times.
 Here she is, almost done!!!
I cut 2 pieces of ribbon at 14" and burned the ends to keep them from fraying. Then I clamped one end in the ribbon clasp, I wrapped the ribbon around the clasp before I clamped it to help protect the metal from getting dented or scratched.
You're done!!!! So easy right?
Now for some finished pictures!!!

I did this one in ivory. I folded EVERY circle in half, it's extra fluffy and full :)

I LOVE how this gray one turned out!! I don't wear much gray, but I LOVE how sophisticated it looks with the gunmetal colored beads!!
 Red is my ALL-time favorite color, so I couldn't leave her out!!!
So cute right??!!!! Now I need to work on some sort of jewelry organizer ... it's actually in the works and I will show it to you once my closet is finished. :)
And one more time ... let's compare!!

The original
My version, pretty close right??
And let's break down the cost ... If you buy the chiffon online and only use 1/4 yd that's $.40. Since I bought it at Joann's I spent $1.50. The clasps were $2.99 but I got 12 sets or something so that's $.25 and I already had the ribbon, thread and beads.
Sooo, pretty much this necklace only cost me $1.75!!! And if you are smart and buy the online Chiffon, it's going to cost around $.65, assuming you have the beads, thread and ribbon on hand. CAN YOU BELIEVE IT??!!! I think it looks just as good as the original and it cost a TON LESS!!!
REMEMBER ... Don't use the Polyester chiffon or it will fray EVERYWHERE and get all over your shirt when you wear it, trust me!! You don't want to have to remake them like I did :(
If you love the necklace, but don't want to make one, I'm thinking about putting these up in an ETSY store ... let me know if that sounds like something you would be interested in!!
I'm joining these parties:
Wednesday, April 21, 2010
HMMM ... I was thinking
How many, if any, of you live in the Salt Lake/Utah/Davis County area? I ask because I saw this great segment on Studio 5, you may have as well, about swap parties.
Have no idea what I'm talking about? Well, a bunch of ladies get together and they bring things from their home that they aren't using anymore, or something that never quite worked the way they had hoped. Pretty much anything that is in good shape and that you think someone else may like. Anyway, you bring all the goods and then we all go through and "shop" the selection. All in attendance leave with new goodies that didn't cost them a PENNY and we get to meet/mingle and enjoy some great food.
So .... I was thinking that it would be tons of fun to have one and invite my bloggy-friends. How does that sound? Would you be down for it? It would be tons of fun and it would be so fun to get to know all of you. And you could bring your friends if you want!!!
I hope you are as excited about this as I am, and I'm really hoping that some of you live in the area!!!
Tuesday, April 20, 2010
Show Us What You're Workin' With #8!!!
First, I would like to say that we are FINALLY HOME FOR GOOD!!! Bucket is doing great and all the tests were normal, so we are RELIEVED!!!
Ok, with that being said ...Wednesday is here ... Who's ready to PARTY??!!! I'm so excited for our Guest Host, she is Jennie from Cinnaberry Suite and she is FABULOUS!!! Seriously, check out her blog, you will fall in LOVE!!!
HEy, to all you FAbULoUs "Me and My Bucket" LoVErS! I'm so excited to be here hosting the 8TH Show Us What Your WOrking With Linky PARTy! SO FUN! I don't know about you, but I think Miss Jess is amazing. She's not only a great MOM, she is OH, SO, CrAFty! (I can't get over how crafty her little brain works!) Thanks Jess for letting me crash your party!
You're probably wondering who the stink I am? Well, my name is Jennie, I am the girl from over at "Cinnaberry Suite".
Let me just blab for a moment about myself! PLEASE DON'T GO...I'll make it quick!
Like lots of you, I like to consider myself a DOMESTIC GODDESS! I get to stay home and not only craft all day (riiight)...but take care of my four little cutie pie kids. I have 3 boys and 1 girl, ages 8,6,4 and 1. I have been married to my biggest fan for 12 years! He is awesome. He truly amazes me everyday. He is the best husband, father, friend, son, brother...you get the point! I want to be just like him when I grow up! Oh, did I mention he's a total hottie? YEP! Love you sweetie! I also have the bestest friends ever (MOM!). They support my madness and think I'm CREATIVE! Really... I'm not joking! I just love them!
I started my crafty blog about 6 months ago. I needed a place, an outlet, to record all the crazy craft/decor happenin's that go on in my head. I have a passion for changing things up (old and new) and with them making my home a "SUITE" place. I'm obsessed with plump red berries and the cozy smell of cinnamon sticks! Hence, my blogs name...Cinnaberry Suite! I hope you girlies skip on over and visit me. I would LOVE that! Okay, I'm done talking about myself. I hope it wasn't too bad! Now, hopefully I can make it up to you. I brought a little tute to share. Yep, a little "Cinnaberry Suite" TUTE! Oh, it smells SO good! I know, I'm a nerd! =)
Here we go!
Here she is...I found her in my head, just like this. She's similar to the one I made HERE
If you can't tell what it is...it's a cute little paper pad to put on your desk or by the phone, with a matching pen. I made it for one of my besties for her birthday. So, you want to make one? Here's what you need:
1 acrylic frame from Dollar Tree

1 wood plaque from Walmart painted and distressed or not.
 1 small memo pad (with the wire snipped out) ink the edges of the paper to give it a distressed look, 1 "rsvp" pen, and a clippy thingy.

Cute ribbon, fun scrapbook paper, buttons or anything you want to make it your own.
First I glued the front of the frame to the bottom of my wood plaque with hot glue.

Then, I tied on some cute ribbon. I placed the knot in front and to the side. Then right next to the knot I added my clippy. Oh, don't forget your paper to write your little love notes on!
Next, I cut some flowers out of scrapbook paper in three different sizes. I inked the edges, then, I layered them and kinda bent the petals up. To top it all off, I added a fun little button. CUTE, CUTE!
The pen is easy...you screw off the bottom. Then, you roll a piece of scrapbook paper around the ink part of the pen and slip it back in. Now your PEN matches too! SUITE! THAT'S IT! Easy, huh? Here she is just ONE more time!
I hope you didn't think my TUTE stunk. I know...I need to stop!=) OKaY, I'm excited to see what all YOUR CraFty BrAiNs have been craftin' up. With that said, lets party! Whoot, Whoot! SMOOCHES!
Totally cute right??!! I KNOW!! And to think, it all started as a simple dollar store frame ... LOVE IT!!! Thanks again Jennie, you are AWESOME!!!
Ok, with that being said ...Wednesday is here ... Who's ready to PARTY??!!! I'm so excited for our Guest Host, she is Jennie from Cinnaberry Suite and she is FABULOUS!!! Seriously, check out her blog, you will fall in LOVE!!!
HEy, to all you FAbULoUs "Me and My Bucket" LoVErS! I'm so excited to be here hosting the 8TH Show Us What Your WOrking With Linky PARTy! SO FUN! I don't know about you, but I think Miss Jess is amazing. She's not only a great MOM, she is OH, SO, CrAFty! (I can't get over how crafty her little brain works!) Thanks Jess for letting me crash your party!
You're probably wondering who the stink I am? Well, my name is Jennie, I am the girl from over at "Cinnaberry Suite".

Let me just blab for a moment about myself! PLEASE DON'T GO...I'll make it quick!
Like lots of you, I like to consider myself a DOMESTIC GODDESS! I get to stay home and not only craft all day (riiight)...but take care of my four little cutie pie kids. I have 3 boys and 1 girl, ages 8,6,4 and 1. I have been married to my biggest fan for 12 years! He is awesome. He truly amazes me everyday. He is the best husband, father, friend, son, brother...you get the point! I want to be just like him when I grow up! Oh, did I mention he's a total hottie? YEP! Love you sweetie! I also have the bestest friends ever (MOM!). They support my madness and think I'm CREATIVE! Really... I'm not joking! I just love them!
I started my crafty blog about 6 months ago. I needed a place, an outlet, to record all the crazy craft/decor happenin's that go on in my head. I have a passion for changing things up (old and new) and with them making my home a "SUITE" place. I'm obsessed with plump red berries and the cozy smell of cinnamon sticks! Hence, my blogs name...Cinnaberry Suite! I hope you girlies skip on over and visit me. I would LOVE that! Okay, I'm done talking about myself. I hope it wasn't too bad! Now, hopefully I can make it up to you. I brought a little tute to share. Yep, a little "Cinnaberry Suite" TUTE! Oh, it smells SO good! I know, I'm a nerd! =)
Here we go!
Here she is...I found her in my head, just like this. She's similar to the one I made HERE

If you can't tell what it is...it's a cute little paper pad to put on your desk or by the phone, with a matching pen. I made it for one of my besties for her birthday. So, you want to make one? Here's what you need:
1 acrylic frame from Dollar Tree

1 wood plaque from Walmart painted and distressed or not.
 1 small memo pad (with the wire snipped out) ink the edges of the paper to give it a distressed look, 1 "rsvp" pen, and a clippy thingy.
Cute ribbon, fun scrapbook paper, buttons or anything you want to make it your own.
First I glued the front of the frame to the bottom of my wood plaque with hot glue.

Then, I tied on some cute ribbon. I placed the knot in front and to the side. Then right next to the knot I added my clippy.
 Oh, don't forget your paper to write your little love notes on!
Next, I cut some flowers out of scrapbook paper in three different sizes. I inked the edges, then, I layered them and kinda bent the petals up. To top it all off, I added a fun little button. CUTE, CUTE!

The pen is easy...you screw off the bottom. Then, you roll a piece of scrapbook paper around the ink part of the pen and slip it back in. Now your PEN matches too! SUITE!
 THAT'S IT! Easy, huh? Here she is just ONE more time!
I hope you didn't think my TUTE stunk. I know...I need to stop!=) OKaY, I'm excited to see what all YOUR CraFty BrAiNs have been craftin' up. With that said, lets party! Whoot, Whoot! SMOOCHES!
Totally cute right??!! I KNOW!! And to think, it all started as a simple dollar store frame ... LOVE IT!!! Thanks again Jennie, you are AWESOME!!!
Sunday, April 18, 2010
Hey Ladies!!! Guess where I am right now?? Nope, not some tropical getaway, guess again ... still nothing? Ok, I'll tell you ... THE HOSPITAL!!! My poor Bucket!!! The antibiotics he was on did such a great job that they killed EVERYTHING in his little tummy so he wasn't absorbing any nutrients leading to dehydration. So, we are here, he has an IV and they say we will be outta here tomorrow morning!! YAY!!! I HATE this place and don't ever want to have to bring him back. Well, I don't hate the people or the service, they are great. I just hate the hospital in general.
Ok, enough of that!! Let's have some fun!! My BBF (Best Blog Friend) Lori, from Life as Lori, is here today and she has a GREAT project to show you all!!! Her blog is so cute and she has such fun ideas, go check it out!!!
First, I would like to thank Jessica for having me over. It's nice to meet all of you!
Hi I'm Lori at Life As Lori!

I am a wife, mother, daughter, sister, friend, co-worker and probably someone just like you or someone you know. I have been married to my husband Steve for 12 years. My daughter, Emily will be 13 very soon. She plays basketball for her school, hangs out with her friends and acts like most other 13 year olds! Oh, and somehow, when I’m not working or mothering or friending, I’m the Assistant Basketball Coach for Emily’s team!
I love puttering around in my yard and since I started blogging about a year ago, it seems my inner craft bug has decided to creep out –
Enough about me!!!
I'm doing the happy dance..... Can't you just see me??? I'm so happy I'm jumping for joy.... Are you wondering why I'm doing the happy dance??? Well, come take a look... But first, do y'all know Ana from Knock Off Wood? If you don't then you don't know what you're missing. You have to visit her blog. She's incredible....I've been looking for a console (couch) table for a while, but I could never find one I liked. Well, I found some I liked, but I didn't like the price. I went over to Ana's and found a couch table I loved. I decided to make one. Yep, I made one (by myself)! I made candle sticks, so why not make a couch table, right?
Now let's take a look at what I made, shall we??
This is from Ana's blog! I started with this photo and printed the instructions!

I went and bought all the wood and nails.

Then I went to work and followed Ana's instructions step by step! Very easy!
Here are the legs...

Base of the table. Boy, is our shop messy. Time to clean it up.

Putting the top on!

Here she is finished.... Well almost.. Still have work to do, but I'm one happy camper!!!
(silly photo, but keeping it real. Now think Pointer Sisters and sing with me) I'm so excited...and I just can't hide it...I'm about to lose control and I think I like it...Oh yeah!

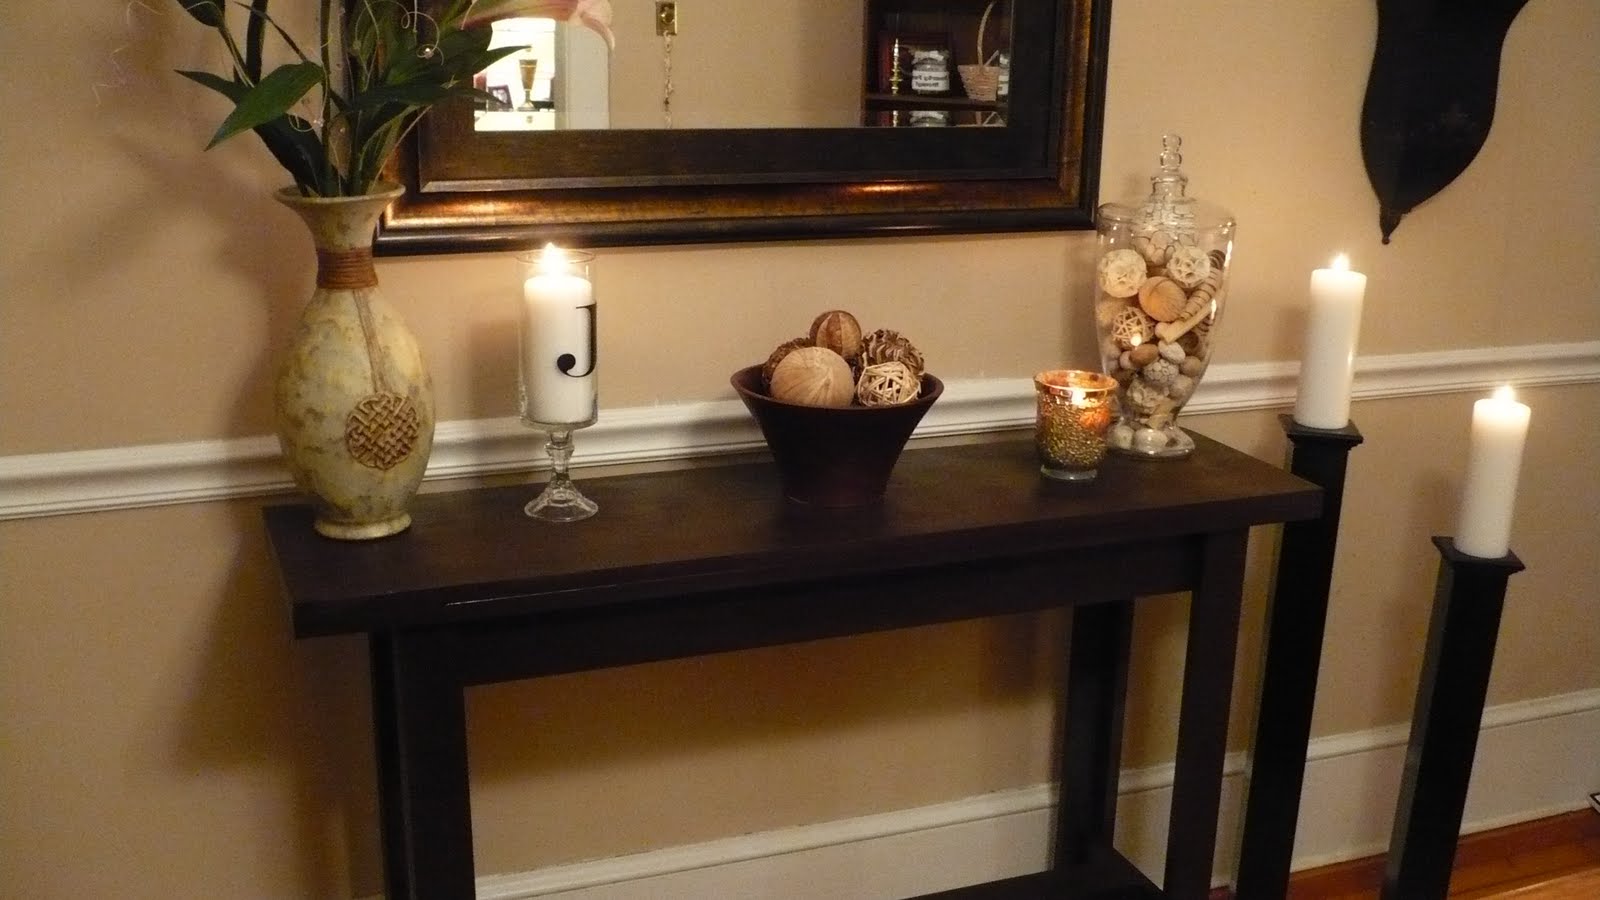
Now that you've stopped laughing at the photo above here's another view of just the table.

I'm sanding! Lots and lots of sanding....

I primed it and then painted.

I used a brown satin finish.


See my candle sticks? Very pretty as well..


I didn't want to put a runner on it. I will later!


It only took me about 4 hours to make, and it cost about $40.00. The finising is what took me the longest!!! I hope you like my couch table. I know I sure do, and I made it without the help of my hubby, A.K.A. "The Drill Sargent" (O.K. he did tell me about safety, safety, safety, and sand, sand, sand, and then sand some more)!!!
What should I build next? Maybe a house??? Yea right!!!
One last photo of me jumping for joy!!!
I also host a Get Your Craft on Thursday and I would love for all of you to join me.

Thanks Jessica for having me over.
Can we say, "SHUT THE FRONT DOOR!!!" $40 for a sofa table??!! I have got to make one, and the best part is that she did it without the hubs. LOVE IT!!!! Thanks so much Lori, you are FABULOUS!!!!
Ok, enough of that!! Let's have some fun!! My BBF (Best Blog Friend) Lori, from Life as Lori, is here today and she has a GREAT project to show you all!!! Her blog is so cute and she has such fun ideas, go check it out!!!
First, I would like to thank Jessica for having me over. It's nice to meet all of you!
Hi I'm Lori at Life As Lori!

I am a wife, mother, daughter, sister, friend, co-worker and probably someone just like you or someone you know. I have been married to my husband Steve for 12 years. My daughter, Emily will be 13 very soon. She plays basketball for her school, hangs out with her friends and acts like most other 13 year olds! Oh, and somehow, when I’m not working or mothering or friending, I’m the Assistant Basketball Coach for Emily’s team!
I love puttering around in my yard and since I started blogging about a year ago, it seems my inner craft bug has decided to creep out –
Enough about me!!!
I'm doing the happy dance..... Can't you just see me??? I'm so happy I'm jumping for joy.... Are you wondering why I'm doing the happy dance??? Well, come take a look... But first, do y'all know Ana from Knock Off Wood? If you don't then you don't know what you're missing. You have to visit her blog. She's incredible....I've been looking for a console (couch) table for a while, but I could never find one I liked. Well, I found some I liked, but I didn't like the price. I went over to Ana's and found a couch table I loved. I decided to make one. Yep, I made one (by myself)! I made candle sticks, so why not make a couch table, right?
Now let's take a look at what I made, shall we??
This is from Ana's blog! I started with this photo and printed the instructions!
I went and bought all the wood and nails.

Then I went to work and followed Ana's instructions step by step! Very easy!
Here are the legs...

Base of the table. Boy, is our shop messy. Time to clean it up.

Putting the top on!

Here she is finished.... Well almost.. Still have work to do, but I'm one happy camper!!!
(silly photo, but keeping it real. Now think Pointer Sisters and sing with me) I'm so excited...and I just can't hide it...I'm about to lose control and I think I like it...Oh yeah!

Now that you've stopped laughing at the photo above here's another view of just the table.

I'm sanding! Lots and lots of sanding....

I primed it and then painted.

I used a brown satin finish.


See my candle sticks? Very pretty as well..


I didn't want to put a runner on it. I will later!

It only took me about 4 hours to make, and it cost about $40.00. The finising is what took me the longest!!! I hope you like my couch table. I know I sure do, and I made it without the help of my hubby, A.K.A. "The Drill Sargent" (O.K. he did tell me about safety, safety, safety, and sand, sand, sand, and then sand some more)!!!
What should I build next? Maybe a house??? Yea right!!!
One last photo of me jumping for joy!!!
I also host a Get Your Craft on Thursday and I would love for all of you to join me.
Thanks Jessica for having me over.
Can we say, "SHUT THE FRONT DOOR!!!" $40 for a sofa table??!! I have got to make one, and the best part is that she did it without the hubs. LOVE IT!!!! Thanks so much Lori, you are FABULOUS!!!!
Subscribe to:
Posts (Atom)