Photobucket Photobucket Photobucket
*** Please excuse my terribly bland and awkward blog appearance. I'm working hard on making it look pretty . . . it's QUITE time consuming!! ***

Thursday, July 29, 2010

Tufted Button Wall Art


Here is my version of a simple and easy tufted wall art. I spent nothing on it, since I already had EVERYTHING on had, don't you love when that happens??!!!


I know, this pic is kinda crappy, but I want to keep the "whole view" picture til the very end!!! haha, ok, let's get down to it ... I started with 2 pieces of leftover shelving from the closet makeover. They were already cut and the perfect size so I didn't have to do anything, AWESOME!!! Miss Morgan, over at Meet Virginia, made some tufted art too, but she used a thrifted canvas. Anything will work, you could probably even use thick cardboard or foam board. Seriously, the cheaper the better!!!


I laid some batting on the wrong side of the fabric I was using and cut them both to the SAME size. The thicker the batting, the deeper your tuft will be. *** I did this so when I attach the fabric to the back of the wood there will be a bit of a cushion, so the wood and staples wouldn't scratch the wall *** I centered the wood on the batting and used my staple gun to attach the fabric/batting to the back. Do the center of the edges first then do the corners. Fold the edges under so it gives you a clean and crisp hem. *** don't know why, but I can't find the picture of this step ... it's pretty self explanatory though, but let me know if you have questions ***


You'll end up with something like this.

Now it's time to make the "tufts" ...


Before you do anything you'll need to decide where you want the tufts to be. Just measure them out and mark them. I used a pen mark, they will be covered up so don't worry about it showing :) Once again I used the staple gun to make the "tufts". It worked like a champ and was super easy.


Here is a pic of all the tufts. Now it's time to make the "buttons" to cover up the staples.


I used these large thumb tacks that are for quilting frames. You could also use buttons, or button covers. I already had the tacks so I just made do :) I hot glued the pin head to a scrap of coordinating fabric. You'll want to trim the fabric down to a circle, leaving just enough to wrap under. I used a bit of hot glue to adhere to the underside.

This is what I ended up with and I used a pair of wire cutters to snip off the pointy part.


Here are my faux buttons all ready to go. This pic is totally unnecessary, but I like the way it looks. haha


Hot glue the "buttons" over the staples. These tacks covered the staples perfectly!!! You can see that I only have a slight tuft, but remember that the thicker the batting, the deeper the tuft.


That's it!!! Here they are above our bed. Cute right? The hubs LOVED them!! It was the first thing that he said when he walked into the room. :) Every morning, when I make my bed, I look at my silhouette pillows and fall deeper in love with them!! Seriously!! If you missed those, check out how I did it here.


Wednesday, July 28, 2010

Mini-Calendars


I'm back in business!! I found the pictures and now I have a few things to post, YAY!!! But, this isn't the project I told you about, it's a different one :) I was in a craftin' mood and the hubs was kind enough to oblige and watch Bucket!!! He's totally awesome!! Ok, here she is ...


Super darling mini-calendars!!! I bought this a few years ago and TOTALLY forgot about it, until I saw Amanda's luggage tags. I kept this one as inspiration and I made lots of them back then but I put them aside when I got pregnant because they are kinda time consuming. Anyway, I just had to show you how I did it!!

Here are the supplies ...


* 12 - vertical name badge holders
* 12 - patterned papers, 1 for each month
* 24 solid papers - 2 for each month, in coordinating colors to the patterned pieces
* computer and printer
* glue stick
* metal binder clip thingy ... hahaha, I don't know what they are called ;)
* ribbon scraps
* embellishments, if desired


Measure your tags and cut 1 solid piece and the pattern pieces accordingly. The other solid piece will be for the calendar, we will use that later.


I made this little calendar using Word. *** Pay no attention to the S on Thursday. Not sure why, but it saved that way but printed up correctly ... go figure!!! *** This is my template and for each different month I type the numbers in and type the name of the month on the top. (you can see it in the finished example). Cut the calendars out and glue to the top of the 12 pieces you already glued together.


I printed up a bunch of lines using Word and cut them down to size.


Glue one to the BACK of each calendar. The original didn't have this, but I realized that the little squares are too small to write in so the lines on the back allow you to write important dates down :)


Tie coordinating ribbons to the binder ring, in between each month. This is a great use for all those ribbon scraps you have lying around!!! This particular calendar has little embellishments, like the snowman, and the edges are inked. It's not necessary, because it's just as cute without it!! :)

These little beauties are VERY time consuming but are great for neighbor gifts, Visiting Teaching, "first day of school" teacher gifts, etc. They are small enough to fit in your purse or diaper bag, or even your desk!!!

I'm working on setting up my ETSY store, hopefully by the middle of next week, and these will be available. If you are interested in purchasing one in the immediate future (I know school starts soon) let me know.

I'm linking up to these parties:

Works For Me Wednesday @ We are That Family


Show  and Tell Green


giveaways
Get your craft on Thurs.
All Thingz Related

Show Us What You're Workin' With #21!!

HELLO!!!! Lately I feel like I am just full of tons of excuses when it comes to this little party!!! GRRR, it's annoying me, so sorry!!! Anyway, I just moved all my pictures from my laptop to an external hard drive and now they aren't organized and I can't find the pictures of today's project. TOTALLY AWESOME RIGHT? Well, I have a funny story about the project ... It's just a little something I whipped up a few months ago while I was finally getting our bedroom all put together. I never blogged about them though, I guess I just sorta forgot!! Then, last night on my way to bed, I saw them and thought that I would use them for today's party. So, this morning I get up and head to my craft room and turn on my laptop. I check my google reader for new posts and come across this little lovely over at Meet Virginia!!! NO JOKE, this is EXACTLY what my project is except I used wood rather than canvas and I used fabric covered thumbtacks rather than buttons. SO FUNNY RIGHT?? Anyway, I'm going to find the pictures today and get them up!!

PARTY TIME!!!


Tuesday, July 20, 2010

WOOT-WOOT!!!!


LOOK WHAT I GOT TODAY!!!!
I've been wanting it forever and my dearest mom and dad bought it for me!!! AHHHHH!!! I'm sooooo freakin' excited!!! Can you tell??? hahaha, the possibilities are ENDLESS and I'm going to have so much fun using it!!!

Any of you that already have it, have any tips or tricks for me???

*** OH MY GOODNESS, I HAVE TO TELL THOSE OF YOU THAT DON'T KNOW, WHAT THIS IS!!!! ITS SOFTWARE YOU USE, ALONG WITH YOUR CRICUT, TO CUT VIRTUALLY ANY FONT, DINGBAT ETC. SERIOUSLY!!! IT PRETTY MUCH ELIMINATES THE NEED TO EVER BUY ANOTHER CARTRIDGE!!!! SO, IF YOU HAVE A CRICUT, YOU MUST BUY THIS!! I GOT THE DOWNLOAD + THE BACKUP CD FOR ONLY $58!!!! THATS LIKE THE COST OF ONE CRICUT CARTRIDGE!! I BOUGHT IT FROM SCRAPPING TABLE, SHE HAS THE BEST PRICE OUT THERE!!! ***

Show Us What You're Workin' With #20!!

Welcome back ya'll!!! I'm excited you are here because I have a SUPER EASY and super cute thing to share with you!!! I didn't take a lot of pictures because I was totally making it up as I went along and I didn't plan on the outcome ... but it turned out great!!! Luckily it's all quite easy, but ask away if you have any questions!!

I'm trying the collage thing out again, you still feelin' it?


I have THREE cute projects in the works and a GIVEAWAY that I'm ironing out the details for, so that means that I AM BACK!!!!! I was so un-motivated lately, it was depressing!!!

*** PLEASE REMEMBER TO LINK BACK AND SHARE SOME LOVE TO YOUR FELLOW PARTY-ER'S!!!!! ***


Tuesday, July 13, 2010

Show Us What You're Workin' With #19!!

Have you ever not been able to upload pictures to blogger?!! Well, it's happening to me right now, and it's driving me CRAZY!!! It's pretending to be loading them but then it times-out or something. I have no idea why, so for now it's just the party and I will keep trying ... I'm sad about it :( It wasn't anything super fabulous, just a little something'-something' but still cute ... for now, enjoy the party and let's see what cute stuff you share this week!!!

*** Remember the one simple rule, PLEASE linkback somewhere on your blog. If you are deleted, it's because I couldn't see the link-back. ***


Friday, July 9, 2010

Friday Features!!!

You all are so awesome!! I loved what you shared with us this week, and here are a few of my favorites!!!


Patriotic Art @ SSB

LOVE LOVE LOVE this patriotic art at SSB. Her little one made it and I think it looks PROFESH!!!


Decor Chick's Double Sided Flower Pots

Another Fabulous idea from Decor Chick!! Soooo many houses around here have windows like this above their door and I think it's such a brilliant little idea!!!


This Thrifty House: Spray Painted Pillows

SERIOUSLY??!!! Spray Painted pillows??!!! These look like something straight outta PB!! Am I right?? I know!!! Hop on over to these lovely blogs and show 'em some love!!!


Thursday, July 8, 2010

Girly-Girl Lunch Box


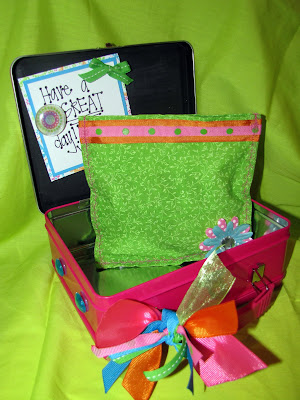
This little turkey is my niece Kennedy. She lives in Florida ;( and starts kindergarten this year. She gets to go to full day kindergarten, which I think is pretty awesome!!! I figured that since she is a big kid now she needs her own fabulous lunch box. So ... I made her this:


Super cute right?? I KNOW!!! It was super easy too, and it didn't cost much at all!!! It started out as a plain, pink metal box that I got at the craft store for like $5. I went through my paper stash and used mod-podge to adhere the paper to the box. I did one piece of paper at a time and let the glue dry completely before adding the next piece of paper. I wanted all the paper to be covered in mod-podge to help protect it from food or any sort of liquids that may come in contact with it.


Once that was all dry I added the bejeweled princess crown sticker, it was $2. The K is a wooden letter that I got for $.30 and painted green. I hot glued the jewels on, then used glossy accents (you could also use the new mod-podge dimensional stuff)to cover all the stones. This dries hard and coats everything, like resin, and keeps the stones from falling off.


The sides were looking too boring, so I glued some large jewels on and tied a bunch of matching ribbons onto the handle.

When I was in Elementary School, my favorite part about taking a lunch was that my mom would always write a note on my napkin. I looked forward to it everyday. I wanted Miss Kennedy to be able to experience the same thing so I did this ...


CHALKBOARD PAINT!!! Seriously, there are a zillion and one ways to use the stuff and I LOVE 'EM ALL!!! I painted the entire inside of the lid (and the sides too) and let it dry in between coats, I did 3 coats total. The next day I cured it by rubbing chalk all over and then wiping it off. Now my SIL can write little love notes or draw pictures and Kennedy will love it!! After doing this I realized that since the box is metal, a magnet would stick. So, I made one of these ...


I didn't have any plain magnets, so I just used a little scrapbook magnet that I have had forever!! She worked like a charm!!


So, now my SIL can write a quick note on the chalkboard, or write something on a cute little piece of paper and use the magnet to hold it in place!!


And here it is with the re-usable bag I posted about yesterday. SOOOO CUTE RIGHT??!!! I love it soooo much, I wish I had somewhere to go everyday so I could have my own!!


Tuesday, July 6, 2010

Show Us What You're Workin' With #18!!


I'M BACK!!!!!!!!!!!!!! I apologize for being MIA last week, things got so hectic the week before I left that I totally forgot to take one of you dolls up on your offer to host!! MY BAD!! Here is a pic to show you what I was doing last week ...


This super cute guy became an OFFICER in the US Army!!! Totally awesome right? I'm so proud of him I can hardly stand it!!!

Anyway ... on to my simple and super easy project!!

I made this quick and easy reusable sandwich bag. I know this isn't an original idea, but I feel like my upcycle method is original.

I decided to try to do the collage method to show you what I did rather than posting all 8 pictures and making this post ridiculously long ... click on it to enlarge it. It's super easy, but let me know if you have any questions.

I started a party rule that says that you have to post back to my party somewhere on your blog or I will delete your link. UNFORTUNATELY, there were some at the last party that didn't link back. I didn't have the heart to delete them though since it was my first time having rules ... But, this week I won't be as easygoing ... as you know, it takes a lot of work to set up and do these parties every week. And you all spend time on your projects, and it's not fair if people aren't linking back because your projects aren't getting the "airtime" that they deserve. So, please, link back and we all can continue enjoying this party!!!


*** I have a cute lunchbox that goes with this bag that I will post tomorrow!!! Now that the hubs is back I'm kicking my blogging into FULL GEAR!! I actually toyed with the idea of retiring this baby, but I realized that I enjoy it too much and I've made too many cyber friends to throw it all away. NOW, LET'S GET DOWN TO BUSINESS!!! ***

I am linking up to some parties this week, I almost forgot how it's been so long!!! LOL :)

Whatever Goes Wednesday @ Someday Crafts