We've all seen the AWESOME hand cut silhouettes and we all know that they aren't cheap and it isn't like there are people that cut them on every corner. So, I decided to give it a go all by myself. I did one of Bucket and it's now in his room, that he doesn't even sleep in, but that's not what this post is about. I recently re-vamped our bedroom a bit and decided I needed some throw pillows. I got the gears a-turnin' and thought it would be cute to make them with mine and my husbands silhouettes on them. And that way when I make the bed I would put the one with his face on his side of the bed and mine on my side. TOTALLY FABULOUS right??!! Yeah, I was pretty excited about it. Ok, so let's get to it.
First thing I had to do was take the silhouette shots of me and the hubs. Let me say that was a CHORE!! Mostly because I couldn't keep a straight face for the life of me, and that I absolutely HATED each one we took. Normally I would choose to just print the silhouettes off with the printer, but I was out of ink so I just went with the next best thing. I got out my freezer paper and taped 'er up to the computer screen and traced it with a sharpie, just make sure you write on the paper side and not the shiny side.
Using the same tape I just used, I taped the paper down to my cutting mat. Then cut it out with an exacto knife. Be careful to stay on the line and not tear the paper since this will be your stencil. Put it aside, they will come into play in a minute.
I only had 20 inch pillow forms, and since I wanted to keep the cost down it was going to have to work. That being said, I would have liked to use a bit smaller next time. Adding 1 inch for seam allowance on 2 sides and 1 1/2" for the other 2 sides *** YOU WILL SEE WHY IN A MINUTE *** I cut the Burlap at 21" x 21 1/2", 2 pieces per pillow. This was my first time working with Burlap, I'm a late bloomer I know, so I measured it 15 3 times before I cut it :).
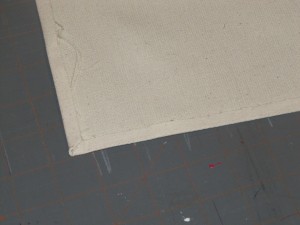
I originally was going to stencil right on the burlap but I decided I wanted more of a contrast, so I dug out some canvas from the fabric stash and cut (2) 12 inch squares. Then using my iron I folded and ironed under 1/2" to make sure I had clean edges.
Center your image stencil on the canvas and iron it, shiny side down, with a HOT iron. *** The freezer paper box has the instructions, so don't worry you can't mess it up. ***
I chose a blue-ish paint that compliments the accents in the bedroom and using my stenciling brush I dry brushed (dabbed most of the paint off leaving a tiny amount on the brush) the paint on. I did the outline first, then worked towards the center.
Since I didn't use a lot of paint, it dried very quickly. I pulled the stencil off and this is what I was left with. I wasn't totally happy with the way my mouth and chin looked so, using a fine paintbrush I added a bit to the lips to offset the chin ... heehee :) I swear I don't have Jay Leno chin!!
Now it's time to pin and sew the canvas down. *** MAKE SURE THE 21 1/2 INCHES ARE RUNNING LONG WAYS AND THE 21 INCHES IS LEFT TO RIGHT *** Pin the canvas 5" from the bottom and 5" from each side. You will have 5 1/2 inches from the top.
Sew the canvas to the burlap using a 1/4" seam, being sure to back-stitch at the beginning and the end.
Now it's time to close 'er up. Put the other piece of burlap on top of the piece you just finished, once again remembering to pin all around the edges. Sew a 1/2" seam on 3 sides, back-stitching at the beginning and end. Then do a zig zag stitch to help keep the burlap from unraveling, you could also use a serger if you have one.
Snip the corners and then turn right-side out. Use a pencil, scissors or some other skinny-ish tool to push the corners out. Put your pillow form in your new case to make sure everything fits nice and tight. Take the form out and get ready for some more ironing and sewing.
Now it's time to fold and hem the opening. Fold over 1/2" and iron, then fold it over one more 1/2" and iron again. Using a straight stitch sew a 1/4" seam all around the opening. Cut (10) 6 inch pieces of ribbon that coordinate with your pillow and burn the ends with a lighter or use fray check to help keep them from fraying. Find the center of your opening and pin one piece to the front and one piece to the back. Then do the same 1" from both sides. Then once more, on each side, in the middle of the side and the original center. HOPE THAT'S NOT TOO CONFUSING. Make sure they all line up and then sew them down, going back and forth a few times to ensure they don't come loose. Put your pillow form back in and tie the ribbons.
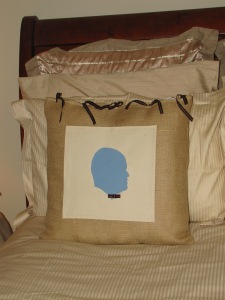
I opted to just tie the ribbons in a knot because I like the look better than a bow, but you can do whatever you like. I also chose to add a little bow to my hair to tie the ribbon back into the pillow.
And a little bow tie for the hubs, I think it's cute :)
Here they are on the bed. I LOVE the punch of blue against the neutrals in the pillows behind it.
Let's get to the price:
I used about 1 1/2 yrds of Burlap and it was $2.99 yard with my 40% off coupon
I already had the ribbon, paint, canvas and pillow forms so BOTH of these beauties were less than $5.00. YAY!!! Personalized, custom made throw pillows for practically free, I LOVE LOVE LOVE practically free!!
I hope you like my newest idea, PLEASE DON'T HESITATE TO ASK IF YOU HAVE ANY QUESTIONS!!


Hi Jessica. It's nice to meet you. So sorry to hear of your troubles with wordpress....I've thought of switching myself, but I'm too afraid! lol.
ReplyDeleteAs for these pillows, wow! What a great project! I would love to have some of these for our bed. I'm going to follow your blog so I can see more of your projects.
I hope you'll consider stopping by my blog this week for my first Friday Favorites party. Each week, I'll be picking some of the posts that are linked up to feature for the following week, and these pillows are definitely feature worthy!
Sorry to hear about all your troubles with Wordpress...welcome back to Blogspot! Your idea with the pillows is soooo neat...luv them! Come by and check out my new PARTY and CASH GIVEAWAY...I think you will luv them:)
ReplyDeleteBlessings,
Linda
Love anything to do with silhouettes, and these turned out adorably.
ReplyDeleteCongrats,
Kathleen
http://firefliesandfamily.blogspot.com
These are sooo cute! Love these pillows!
ReplyDeleteStopping by from Trendy Treehouse to say Hi!
I am a follower so I can come back & read more!
Please stop by!
http://extremepersonalmeasures.blogspot.com
Adds just the right touch to your bedroom. Love this idea. I make silhouette ornaments and plaques for kids rooms. Very fun. They are my favorite since I was a little girl. And I love burlap, so I guess I have to start some for my room. I wanted a change. LOL
ReplyDeleteThanks for linking up at Trendy Treehouse and for the tips.
Tara
These are so cute. I really love the color you chose. I'm visiting from Someday Crafts.
ReplyDeleteCute cute!! I am visiting from Life as Lori. I love silhouettes. I honestly have been thinking about doing a silhouette of my dog but I love the ones of people. Great idea. Thanks for sharing!!
ReplyDeleteSuper cute idea. Love the bedding.
ReplyDeleteThose are cute!!! And great tutorial!
ReplyDeleteThose are lovely...and I love the punch of blue too! Very cute!
ReplyDeleteBlessings, Grace
Linking up from 'Trendy Treehouse' to say HI... nice idea and they would make nice gifts...
ReplyDeleteSandy
http://thewondersofdoing.blogspot.com/
Thanks so much for sharing these and linking up. they are really cute--I love the ties across the top.
ReplyDeleteThanks so much for sharing these and linking up. they are really cute--I love the ties across the top.
ReplyDeleteI love the pillows.. great job.
ReplyDeleteYour blog looks great... I'm almost finished with getting all of your goodies... I'll get it in the mail Monday or Tuesday... I'm having fun trying to figure what you will like...
Thanks for joining Get Your Craft on Thurs. Please join me again next week for another great party.
Lori
Silhouettes and burlap! I love the combination!
ReplyDeleteThanks for linking up to Make it Yours day!
Hey. Thanks for linking up for Friday Favorites. Hope to see you again this week!
ReplyDeleteI'm featuring you today for Friday Favorites. Come by and check it out!
ReplyDelete