*** I'VE DECIDED IT WOULD BE FUN TO DO A LITTLE GIVEAWAY!! I'VE LINKED THIS PROJECT UP TO MY FAVORITE SITES AND ONE OF YOU LUCKY GALS WILL WIN THIS SET OF 4 COASTERS!! ALL YOU HAVE TO DO IS LEAVE A COMMENT ON THIS POST AND ON SUNDAY 2/28 AT MIDNIGHT I WILL CHOOSE A WINNER!!! TELL YOUR FRIENDS :) ***
**** DUE TO THE TECHNICAL DIFFICULTIES WITH WORDPRESS :( I'VE DECIDED TO GIVE YOU A CHANCE FOR A SECOND ENTRY, ALL YOU HAVE TO DO IS BECOME A FOLLOWER. AND TO MAKE IT EVEN SWEETER I WILL THROW IN A LITTLE SOMETHING EXTRA TO THE LUCKY WINNER!!! ****
I'm not gonna lie ... I LOVE HOME DEPOT!! Ever since I started this blog I honestly love going there. I will say it's sort of empowering being one of the FEW ladies in there. Yes, I still have to ask some questions, but for the most part I know where the ESSENTIALS are and I totally DIG it!! Anyway, I was there the other day and I decided to finally jump on the chalkboard craze and by myself a can of the magical stuff (I really do consider it magical). So many different applications for it were running through my head and one of the quickest and cheapest was chalkboard coasters. I thought they could serve a few purposes ... obviously the most important function is to prevent water rings on your coffee table and other surfaces, but I also thought they would be RAD as funky Place Cards (MY FAVORITE FUNCTION). And then the party guest could take it home after ... SO 3 TOTALLY PRACTICAL AND TOTALLY FAB FUNCTIONS!!! Oh, my hearts a flutter just thinking about these beauties. Ok, now for the supah dupah easy tute ...
*** Oh first let me say that I am missing 2 of the "during process" pictures. Luckily, they aren't crucial but it's still rather annoying!! ***
SUPPLIES
- Cheap-o ceramic tiles from the Depot $.16/each
- ChalkBoard paint, I got plain black but you can get it tinted to a variety of colors ... I'm trying that next!!
- Large paintbrush
- Glossy Accents or Diamond Glaze, I use Glossy Accents only because it's all I can find in the stores
- Acrylic Paints, in color(S) of your choice
- Patterned scrapbook paper or some other printed image/design you like
- Sticky back stiff black felt or plain black felt will work too
The supply list is super small and SUPER cheap. The only investment ($11.00) is the paint and it will last forEVAH!! Ok grills, let's do this!!

Super Cheap $.16 white tiles from the Depot. They come in other colors, but they are more expensive and it doesn't matter anyway since you are painting them. Its hard to see in this picture, but there are 2 bumpy things on each of the 4 sides of the tiles. I first tried handsanding them off and that didn't work, so I busted out the orbital sander and used the roughest grit sandpaper I had to get rid of 'em. It only took a few minutes total.

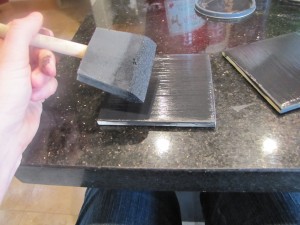
Paint the front and sides of the tiles ... I did about 3 coats, letting each dry for about 15-30 minutes before moving on to the next.
Paint the back a bit too, you don't have to worry about the middle because it will be covered with the felt.
I looked online for paisley and scroll patterns that I liked, but they were all too ornate so I turned to my trusty scrapbook paper stash and found a pretty leaf paper that I liked. I didn't have any graphite paper so I just rubbed my pencil on the back of the paper and it works just as well. *** Here is where picture #1 that I am missing would come in .... GRRR!! *** Turn the paper over and position it on the tile where you want it. Hold it down tight and using a pen or stylus, trace over the design making sure to apply enough pressure.
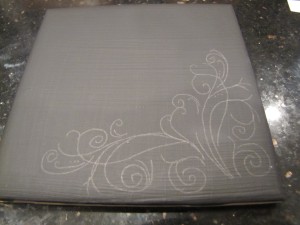
This is what you will be left with. This isn't actually the design I used, but you get the idea!! Then I used a fine tip paintbrush and traced over the lines, you could also use a paint pen. *** missing picture #2 alert ... *** After my painted design was dry I decided that they weren't shiny and protected enough for my liking. Normally, I would just spray a glossy finish but since it's chalkboard I used my Glossy Accents and went over the design. It was nice because the fine tip of the bottle allowed me to keep the gloss on the design and not on the chalkboard part. Follow the directions on the bottle as far as how long to let the stuff dry.
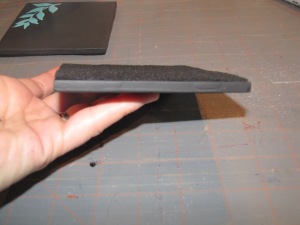
I wanted the coaster to look as finished as possible, and so nobody would every know it was a cheapy tile, so I added some felt to the back. And this way it protects your table or other surface. I opted to go with the sticky back felt for 2 reasons. 1. It's already sticky so I don't have to glue anything and 2. It is much stiffer than regular felt.
Here they are in all their glory!! Super cute right?
Here it is as a Place Card.
These are so STINKING cute and fun to make!! And once again, super cheap. REMEMBER TO COMMENT ON THIS POST SO YOU CAN BE ENTERED TO WIN ALL 4 OF THESE CUTIES!!! Thanks for reading!!
And as always, check out my ladies ... they sure know how to part-ay!!


Great idea!
ReplyDeletethanks for sharing
blessings
barbara jean
It took me several tries to actually see your post, so maybe that's why your are not getting any comments.
ReplyDeleteNice tiles, lovely tutorial (even with the missing pictures)
those are cute, and how fun, it's could be the new take on wine charms - you can write your name on your coaster and everyone will know which drink is theirs!
ReplyDeleteI LOVE this idea!! Very clever and FUN!! Thank you for sharing and thank you for a giveaway!!
ReplyDeleteWhat a fabulous idea! I have made tile coasters in the past using modge podge and tissue paper. I love the idea of using chalk board paint! And great to use those as place holders. Thanks for sharing!
ReplyDeleteHoly cow! This is such a neat idea. I love love love it. I would love to win them.
ReplyDeleteVery cute. I would have to write..."USE THESE" with my family. hahaha
ReplyDeletefantastic idea! I love the way you can write someones nameon them... so hoping I win :)
ReplyDelete~ Emily N. from "too Blessed to Stress"
This is a great idea! Love it!
ReplyDeleteI've picked our partners for the spring fling gift swap and I need your email address, so you and your partner can exchange mailing addresses. Please email me at lifeaslori@yahoo.com
ReplyDeleteThose are so cute!!!
I've yet to see chalkboard coasters. These are super cute and a great idea! I will feature these at somedaycrafts.blogspot.com. Grab my "featured" button.
ReplyDeleteI would love to win these cute things!!
ReplyDeleteSandy
http://thewondersofdoing.blogspot.com/2010/02/play-along-food.html
These are adorable! I never get tired of seeing all of the uses for chalkboard paint!
ReplyDeleteOhhh... I stinkin' love these! I absolutely cannot wait to make these! I know they won't be this cute, but I'm willing to try! Of course, if I won them... :) Thanks for the great giveaway!
ReplyDeleteWhat a CUTE idea. I would loveee to win.
ReplyDeleteCount me in! They're so cute! One thing I don't have - coasters and I just got new glass coffee table and end tables. Perfect! Great tutorial!
ReplyDeleteThanks for linking to the DIY Project Parade!
These are great. I would have never thought to use chalkboard paint.
ReplyDeleteGreat idea & would love to win and will have to make them if I don't!
ReplyDeleteThese are so stinking cute. I have been looking for coasters for so long and resorted to some that I don't really love but who would have thought making them with chalkboard paint...these are AWESOME!
ReplyDeleteI was going to buy some of these but I guess I don't need to. Easy enough. Thanks for the tip! (but maybe I'll win them :)
ReplyDeleteVery cute idea! I have got to get me some chalkboard paint!
ReplyDeletevery cute and I'm sure you had so much fun making them and using some.
ReplyDeleteI love anything chalkboard. Looks like a labour of love though.
ReplyDeleteDana
Very cute!!! Thanks for sharing with Made it Monday! Jules
ReplyDeletei love this idea! They turned out so cute!
ReplyDeleteHow cute!! I just bought some of those cheap tiles to make coasters with!! I am def. trying this now! (unless of course I win!)
ReplyDeleteVery cool! These would make great hostess gifts!
ReplyDeleteWhat a fantastic idea- I am totally stealing it:)!
ReplyDeleteI will be making some of these in the very near future!!
ReplyDeleteHello. Heard about you through Somday Crafts... When I saw these coasters featured I was all-I got to learn how to make those. weird thing but Im addicted to coasters-I think I have 3x the amount of coasters than glasses in my house.
ReplyDeleteOMG I hope I win but if I dont I am most def. making these.
thanks :)
Aimee
Very cute - and practical!! Would love to win!
ReplyDeleteI was looking for ideas for my extra chalkboard paint . . . this is perfect! Thanks for such a creative idea!
ReplyDeleteSuch a cute idea. I love everything "chalkboard"!
ReplyDeleteI have become a follower and invite you to do the same.